Most, if not all, of the images in my current project's outcome have been drawn traditionaly, scanned and edited in adobe photoshop, and later arranged in sync to the audio with Final cut pro.
After going over the sketch with 0.7 fine pen and rubbing off the pencil marks, I scanned the image onto the computer; the scanner was an EPSON at the most. This proved to be a challenge on some cases as I did the sketches on an A3 sketch pad, and at some times, the images would end up even larger than the scanner itself.
Before I scanned the image, I made sure the following diodes were added to the scanner settings. First I had to set the 'Scan To Folder' to the folder in my key which contained all the current scans. Then I had to name it on what the image is about. Finally I set the Automatic Task to Adobe Photoshop CS3, so once the image is scanned, it will automaticly open on that programme.
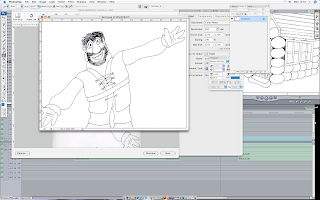
Once the image is scanned and opened up onto Photoshop, the first to do would be to rotate it to the right angle. To do that, I go to Image - Rotate Canvas, then I click on whatever is necessary at the time; Here, i'd click onto 90 CW (clockwise). With that sorted, it's tome to sort the Brightness and contrast. I go to Images - Adjust - Brightness/Contrast to bring up the tiny window.
I click onto Use Legacy First, because If I put my arrangements first and then click use legacy, it just returns them back to 0. After clicking on Use Legacy, I set both Brightness and Contrast to +51, just so the background is white, and only the lineart can be visible.

With the image now set and cleaned up with the rubber tool, I can now save it as the same image I set to the key. After that, I can upload it to Final cut pro.

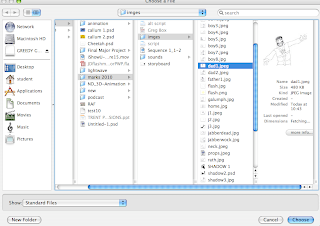
From Final Cut Pro, I go to the colomn on the left, ctrl-click and select import-files. Then from this window that appears, i select the image that I had saved form Photoshop. You can also get the import option from the file tab at the top row.

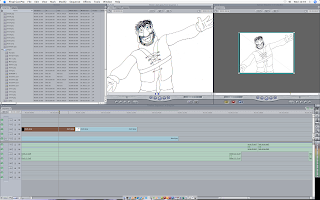
Now that the image is uploaded onto Final cut Pro's roster, I can set it onto my outcome timeline. When a still image is added onto a timeline for the first time, it's rougly ten seconds or longer. But not only can I stretch and squash it's duration, but I can also make it move, or 'animate', by adding command points on the start and finish of the duration.
And that's how I imported traditional media to my final outcome. It's weird, because I did more work with flash than I did with Final cut, yet I know more about final cut than I do Flash. I think it's because I understand the fundamentals of Final cut More than I do With Flash.


No comments:
Post a Comment